- 组件中的数据传递
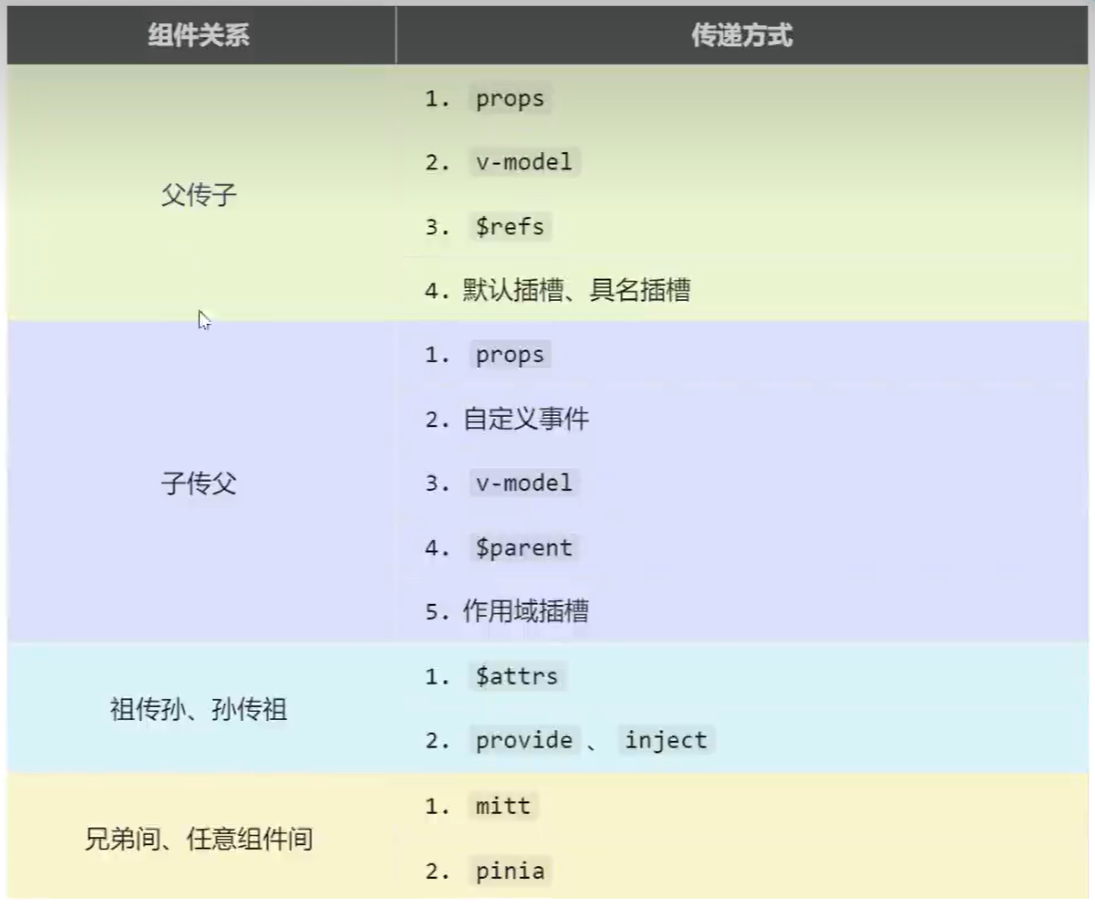
[[props]]
- 父组件向子组件的传递 传递
html
<Lovetalk car="caar"></Lovetalk>接收
ts
const props = defineProps(['car'])
console.log(props.car)
或者直接使用插值语法。 2. 子组件向父组件传递 接收 向子组件传递一个函数,以便子组件通过调用这个函数将参数传递到父组件上
html
<template>
  <!-- <count></count><br> -->
  <Lovetalk :sendMsg="sendMessage"></Lovetalk><br>
  <Count></Count>
</template>
ts
let msg = ref('')
function sendMessage(msg: string) {
  console.log('send message:', msg);
  ref.value = msg
}
传递
html
<template>
    <button @click="sendMsg('this is a message')">send message</button>
</template>
ts
let props = defineProps(['sendMsg'])自定义事件
- 另一种方式实现子组件向父组件的数据传递
$event
事件对象
事件
例如 @click="abc",click 就是事件名,abc 是事件的回调函数。 在子组件中定义一个事件及其事件的触发及数据传递(emit),然后在父组件中定义触发事件的回调函数(即完成事件的行为) 定义事件行为
html
<template>
  <testObject @abc="say"></testObject>
</template>
ts
function say(msg: string) {
  console.log('say:', msg);
}
定义事件触发 通过 emit 调用相应事件,并传递参数
html
<template>
    <button @click="emit('abc','114514')">事件触发</button>
</template>
emit 用于触发事件。
ts
import { ref, reactive } from 'vue'
const emit = defineEmits(['abc'])//声明事件
事件命名推荐用 - 链接,而回调函数用小驼峰。
mitt
- pubsub/mitt 消息订阅/发布,接收数据组件提前绑定事件,提供数据在合适的时候触发事件
- 事件绑定与触发
方法
- all:拿到所有绑定事件
- emit:触发事件
- off:解绑事件
- on:绑定事件
接收方
- 绑定事件及其事件触发后的回调函数
ts
import emitter_test from '@/utils/emitter';
let computer = ref('mechine')
let toyFromChild1 = ref('')
emitter_test.on('send_toy',(value:any)=>{
    console.log('toy from child1',value)
    toyFromChild1.value = value
})

onUnmounted(()=>{
    emitter_test.off('send_toy')
})
传递方
- 按钮或其他元素触发事件
html
<template>
    <div class="child1">
        <h1>child 1</h1>
        <h2>toy: {{ toy }}</h2>
        <button @click="emitter_test.emit('send_toy',toy)">send to child2</button>
    </div>
</template>

<script setup lang='ts' name='child1'>
import { ref, reactive} from 'vue'
import emitter_test from '@/utils/emitter';
let toy = ref('warthunder')

</script>
<style scoped>

</style>
组件卸载后解绑
组件卸载后解绑事件,释放内存。
v-model
[[响应式基础#v-model 双向绑定]]
- 实际开发很少用
- 但是大家都知道:D
- UI 库大量使用,你可以直接在 UI 库的标签中使用 v-model,但这不是天生就行的 以下写法是等价的
html
<input type="text" v-model="a">
<input type="text" :value="a" @input="a = (<HTMLInputElement>$event.target).value">
v-model 本质上是一个语法糖。
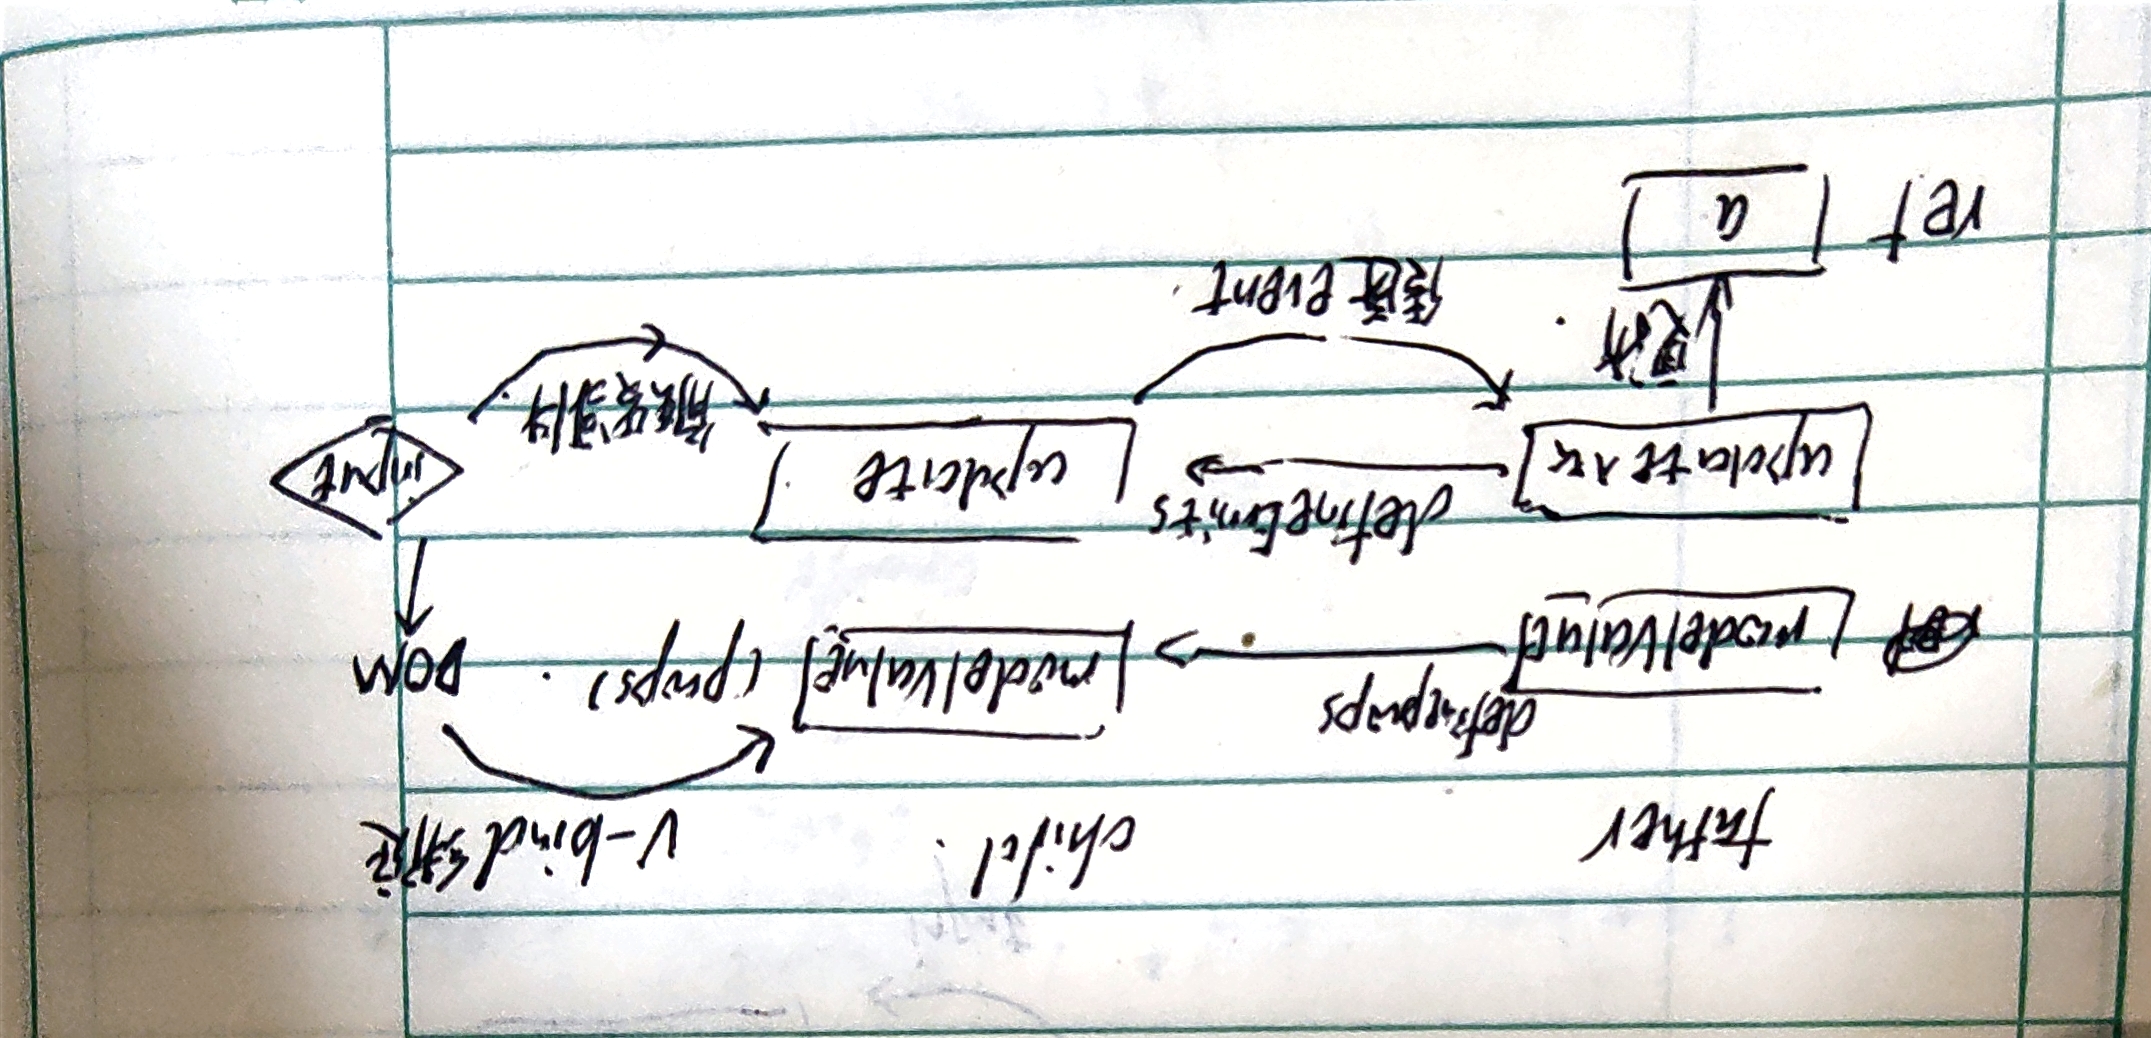
现在自定义一个输入框组件(UI 库),并引入到当前组件中,以说明这个类 v-model 的底层实现。 使用该输入框:
html
<template>
    <input type="text" v-model="a">
    <input type="text" :value="a" @input="a = (<HTMLInputElement>$event.target).value">
    <myUInput :modelValue="a" @update:modelValue="a = $event"></myUInput>
    <myUInput v-model="a"></myUInput> <!--这两种是等价的,v-model是语法糖-->
</template>

<script setup lang='ts' name=''>
import { ref, reactive, watch } from 'vue'
import myUInput from './myUInput.vue';
let a = ref('warthunder...')
watch(a, (newVal) => {
    console.log(newVal)
})
</script>
<style scoped></style>
v-model 的底层实现
- 通过
:modelValue(是v-bind:modelValue的缩写),将父组件中的a变量的值绑定到<myUInput>组件的modelValueprop上,进而将值传递到myUInput组件上; @update:modelValue是v-on:update:modelValue的缩写,它是一个事件监听器,用于监听<myUInput>组件内部触发的update:modelValue事件,以将a值更新为输入框传回来的新值,实现自定义组件与当前组件的数据的双向绑定。[[响应式基础#v-bind 由数据单向绑定 DOM]]- 这里用
$event的原因是因为myUInput是一个自定义组件,这样拿到的就是输入框中的数据值,这里会监听这个事件,事件被触发后则将值更新给a。
接下来看输入框 UI 库实现:
- 引入了事件
update:modelValue,当输入框输入内容后,触发该事件 - 接受了父组件通过
props传递过来的modelValue参数,并在子组件中与之单向绑定 - 触发事件后,返回当前的
DOM对象的值(也就是输入框的值)
html
<template>
    <div>
        <input type="text" class="my-input" placeholder="请输入内容..." :value="modelValue"
            @input="emit('update:modelValue', (<HTMLInputElement>$event.target).value)"/>
    </div>
</template>

<script setup lang='ts' name='myUInput'>
import { ref, reactive } from 'vue'
const emit = defineEmits(['update:modelValue'])
</script>

<style scoped>
.my-input {
    margin-top: 20px;
    width: 300px;
    height: 40px;
    padding: 0 10px;
    border: 1px solid #ccc;
    border-radius: 4px;
    font-size: 16px;
    color: #333;
    outline: none;
    transition: border-color 0.3s ease;
}

.my-input:focus {
    border-color: #409EFF;
}
</style>
**
深入探讨 v-model
指定 props:modelValue 是 v-model 指令的一个自定义用法,它允许你指定一个 prop 来作为组件内部状态和父组件之间双向绑定的桥梁。这种用法是在 Vue 3中引入的,以支持更灵活的自定义组件的 v-model 绑定。
html
<myUInput v-model:modelValue="a"></myUInput><!--指定modelValue作为props沟通子组件因为 v-model 本质上就是一个通过 props 实现的父子参数传递,至于这个 props 的名字是什么,可以通过更改这个 modelValue 的值去自定义,然后就是 UI 库应该考虑的东西了,主要涉及到以下两个方面:
- 子组件触发事件:
@update:propsName; - 子组件引入的
props更名。
应用场景
允许自定义 props 的原因是为了在一个组件的参数上多次使用 v-model 以双向绑定多组数据。 子组件处理
html
<template>
    <div>
        <input type="password" v-model="password" placeholder="type password here"
            @input="emit('update:password', (<HTMLInputElement>$event.target).value)" /><br>
        <input type="text" v-model="name" placeholder="type name here"
            @input="emit('update:name', (<HTMLInputElement>$event.target).value)" />
    </div>
</template>

<script setup lang='ts' name='myUInput'>
import { ref, reactive } from 'vue'
defineProps(['password', 'name'])
const emit = defineEmits(['update:password', 'update:name']) //注意一个vue组件只能defineProps一次
let name = ref('')
let password = ref('')
</script>

<style scoped>
.my-input {
    margin-top: 20px;
    width: 300px;
    /* 设置输入框的宽度 */
    height: 40px;
    /* 设置输入框的高度 */
    padding: 0 10px;
    /* 设置输入框的内边距 */
    border: 1px solid #ccc;
    /* 设置输入框的边框样式 */
    border-radius: 4px;
    /* 设置输入框边框的圆角 */
    font-size: 16px;
    /* 设置输入框内文字的字体大小 */
    color: #333;
    /* 设置输入框内文字的颜色 */
    outline: none;
    /* 移除输入框聚焦时的默认轮廓线 */
    transition: border-color 0.3s ease;
    /* 边框颜色变化的过渡效果 */
}

.my-input:focus {
    border-color: #409EFF;
    /* 输入框聚焦时的边框颜色 */
}
</style>
父组件调用
html
<myUInputCopy v-model:password="password" v-model:name="name"></myUInputCopy>$attrs
- 当前组件的父组件给当前组件的子组件传递数据。
- 存储父组件传递给子组件后没有被
defineProps读取的数据 - 可以通过
:fromFather:$attrs的形式通过props继续传递
$refs, $parent
[[标签的ref属性#标签 ref 属性]]
$refs父传子
html
<template>
    <h1>father</h1><br>
    <h2>house num : {{ houseNum }}</h2><br>
    <button @click="changeRef">click to change the child1 attitude</button><br>
    <child1 ref="c1"></child1><br>
    <br>
    <child2 ref="c2"></child2><br>
    <button @click="getAllChild($refs)">get All Child's DOM</button>
</template>
ts
<script setup lang='ts' name=''>
import { ref } from 'vue';
import child1 from './child1.vue';
import child2 from './child2.vue';
let c1 = ref()
let c2 = ref()
let houseNum = ref(10)
function changeRef() {
    c1.value.playNum++
}
function getAllChild(refs: any) {
    for(let key in refs){//这里的key是ref的属性名,string类型
        refs[key].bookNum++//修改键key对应的对象下的属性
    }
}
defineExpose({
    houseNum
})
</script>- 这里的
c1和c2拿到的是组件的实例引用,通过这个引用可以访问到组件内的公开属性以及方法; - 这里的
$refs获取的是当前组件中所有带ref标签的对象的引用。
$parent子传父 与上述例子同理,只要在子组件中用$parent拿到父组件的引用,然后直接操作父组件通过defineExpose暴露的相关内容即可。
provide-inject
- 实现父孙通信;
- 相较于
attrs不通过中间组件; - 父组件通过
provide传递数据,子组件的后代可使用inject注入数据。、 父传孙
ts
let money = ref(100)
provide('money',money)

let x = inject('money',0)
//第二个参数是默认值,这里其实没有必要默认响应式,因为正常展示只需要一个静态数据就够了
let car = inject('car',{brand:'未知',price:0})
//通过默认值帮助vue插件推导car对象类型
孙传父
ts
function updateMoney(value:number){
	money.value -= value
}
provide('moneyContext',{money,updateMoney})

let {money,updateMoney} = inject('moneyContext',{money:0,(param:number)=>{}})//解构

<button @click="updateMoney(6)">use money</button>